Welcome, Mark, to the OLF! I haven't your answer but am going to postulate that it involves good sharpening technique.

Chime in folks and help Mark out!
| Official Luthiers Forum! http://www-.luthiersforum.com/forum/ |
|
| perfect perfling http://www-.luthiersforum.com/forum/viewtopic.php?f=10102&t=8440 |
Page 1 of 2 |
| Author: | Mark Hanna [ Thu Sep 14, 2006 2:02 am ] |
| Post subject: | |
Hi folks, I'm new to OLF and built 3 guitars. They came out better then expected, NOW I'M HOOKED!! My question is, when I look at some of your guitars, the perfling looks perfect from miter to miter joint. HOW DO YOU DO THAT! When I glue my bindings, (All wood), I can't seem to get the miters, or lengths to match up perfectly. Even time is an issue with the glue set up. Is there a "trick" or way to do this. BTW, this is a GREAT Site! Thanks! |
|
| Author: | SteveCourtright [ Thu Sep 14, 2006 2:05 am ] |
| Post subject: | |
Welcome, Mark, to the OLF! I haven't your answer but am going to postulate that it involves good sharpening technique.
Chime in folks and help Mark out! |
|
| Author: | Pwoolson [ Thu Sep 14, 2006 2:20 am ] |
| Post subject: | |
Mark, Welcome! To your question: I don't there is a "trick" or easy way, except for the reflection in the chisel technique. If you have very sharp chisels (which you need in this craft) and polish the backs, you can see the reflection of the wood in the back of the chisel. Simply turn the chisle until the real wood and the reflected wood are 90 degrees to each other. Then make a smooth "chop". I've had pretty good luck with that technique. Other than that, it's just patience and the willingness to route off a set of bindings when things aren't perfect. |
|
| Author: | Michael Dale Payne [ Thu Sep 14, 2006 2:31 am ] |
| Post subject: | |
Paul is correct. Now the question is how many of the miters on a purfed guitar are true 90 degree miters. For me not many but the same process is used, just adjusting the reflected angle. Fro odd angles I make a fine line drawing of the miter on paper laying the piece to cut on the appropriate place on this drawing and adjust the reflection to line up with the lines on the drawing to get the proper angle on non-90 degree miters. I don't do this on 90 degree miters because it is not needed to tell when you are at 90 degrees. |
|
| Author: | Sam Price [ Thu Sep 14, 2006 2:50 am ] |
| Post subject: | |
I cannot emphasise enough...sharp chisels make more accurate work. |
|
| Author: | Tom Morici [ Thu Sep 14, 2006 2:58 am ] |
| Post subject: | |
Welcome Mark! Are you dry fitting before you try to glue. You know, tape them on and make sure the fit is good first. You mite try a guide block cut at 45 deg. hold your purfling against the block and use the 45 cut to line your "sharp" chisel to make the cut. Just a suggestion. Hope this helps. Tom |
|
| Author: | Pwoolson [ Thu Sep 14, 2006 3:03 am ] |
| Post subject: | |
Michael makes a good point about very few miters being 90 degrees. Perfect example: your average tail wedge/end graft. Because it's angled in a wedge shape, your miter won't be 90 degrees. For something like this I still use the reflection technique but rather than make the reflection 90 degrees, I just project the reflection to where I want it to go. In this case, I'd reflect the side purfling of the end graft so that the reflection made a straight line there the side purfling will fall below the binding. Clear as mud, yes? |
|
| Author: | Michael Dale Payne [ Thu Sep 14, 2006 3:36 am ] |
| Post subject: | |
This is what I am doing I just use the line drawing below the purfling I am cutting to confirm the reflected angle to. |
|
| Author: | Steve Saville [ Thu Sep 14, 2006 3:37 am ] |
| Post subject: | |
Here is a method I used in the past. I took a Zona saw and made a miter box for it. 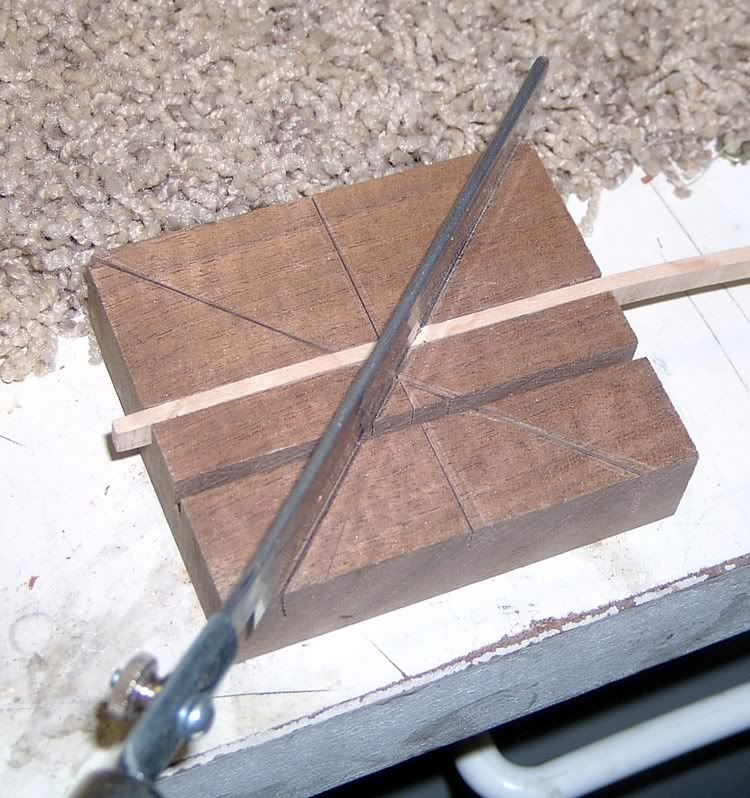
That worked pretty well, but I thought I could do better. On my last guitar, I used a chisel. You really need to learn to sharpen it. I made the final cut while assembly it. I put the binding on most of the way - 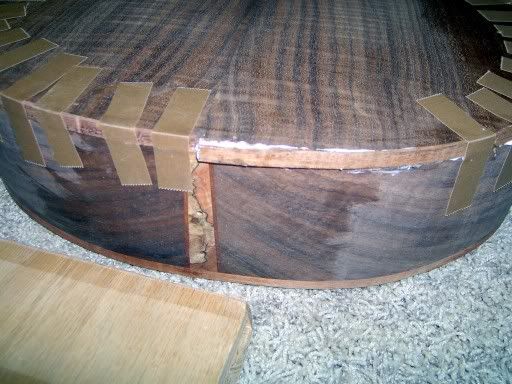
This left me enough room to make that final trim. A sharp chisel will make this a pretty easy job. A dull chisel will pretty much guarantee a poor fit. 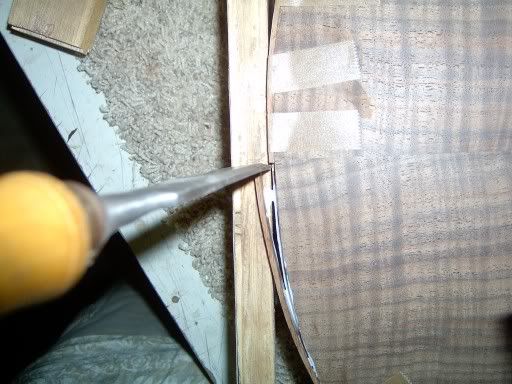 |
|
| Author: | LanceK [ Thu Sep 14, 2006 3:48 am ] |
| Post subject: | |
I too use the chisels reflection to get my miters right, but I think it is important to stress that if at first you don't succeed, try try again. Do it until you get it right! |
|
| Author: | Mark Hanna [ Thu Sep 14, 2006 4:44 am ] |
| Post subject: | |
Thanks guys, but I guess the big problem is when I tape off the binding and purflings when glueing, the tape covers up the joints so as not to make them visable. I've put up a pic so you can see one of the "faulty joints". I thought I read somewhere that some luthiers tack with CA the corners (on headstock for instance), and then put them on with the miters all assembled. I had no luck. Maybe I just need more experience 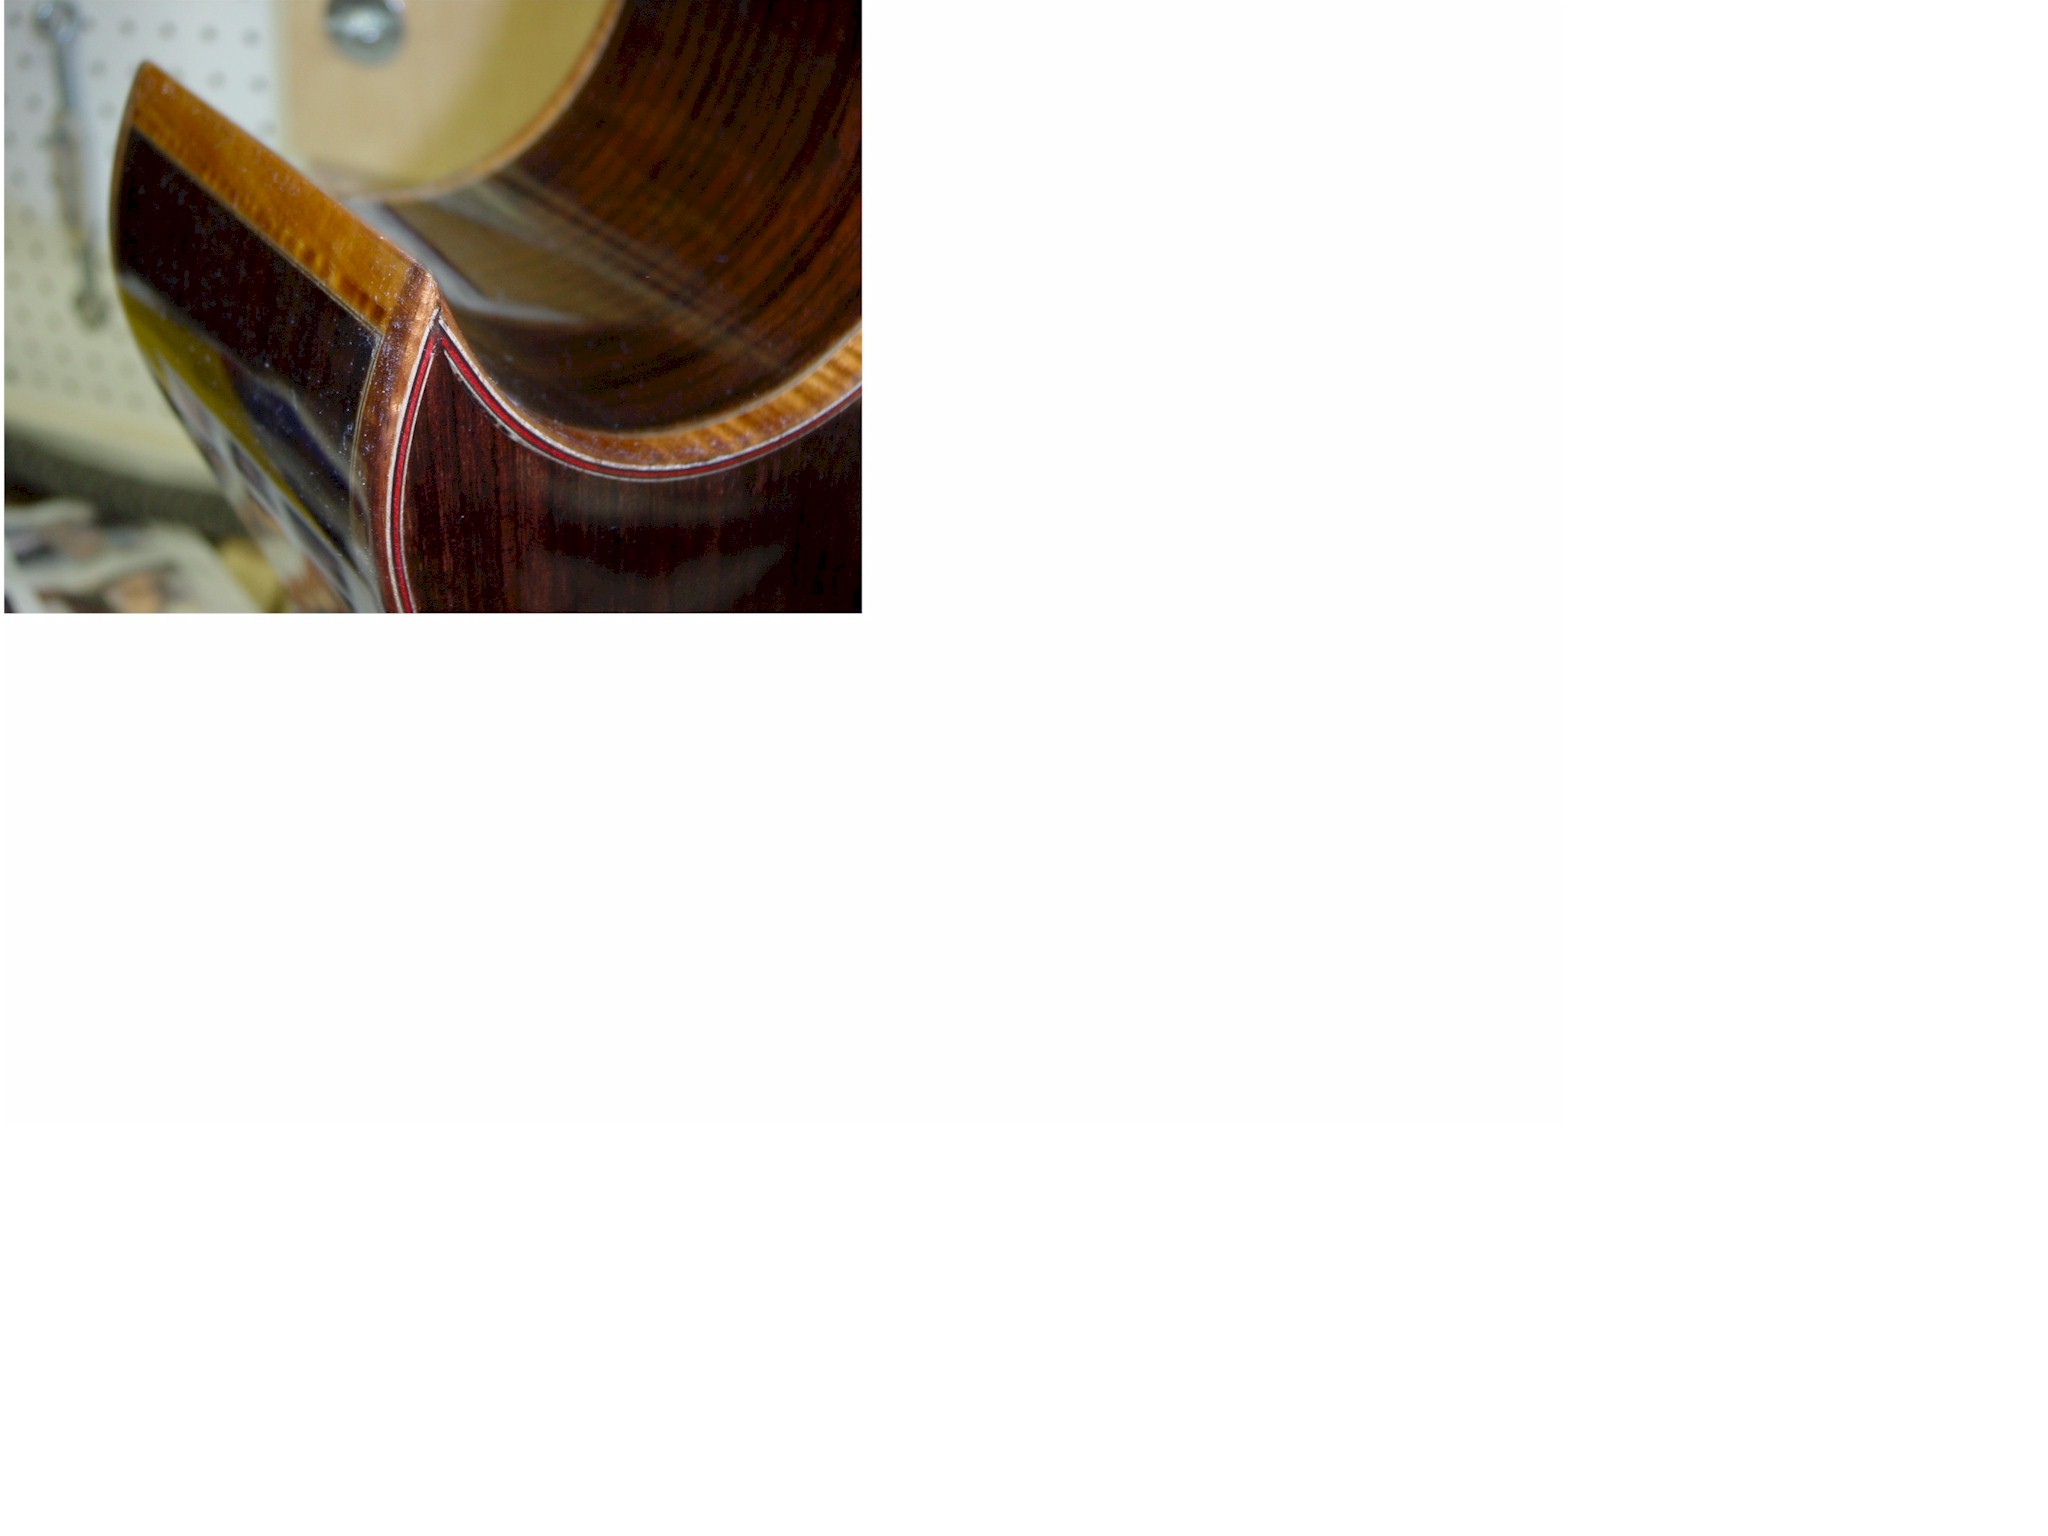
|
|
| Author: | Michael Dale Payne [ Thu Sep 14, 2006 4:56 am ] |
| Post subject: | |
this process is easy on side purfling to end grafts where the purfling continiues to the neck joint because one end is open (not mitered under the neck joint) The tough part is when all edeges a closed defined shot lengths like this rosette 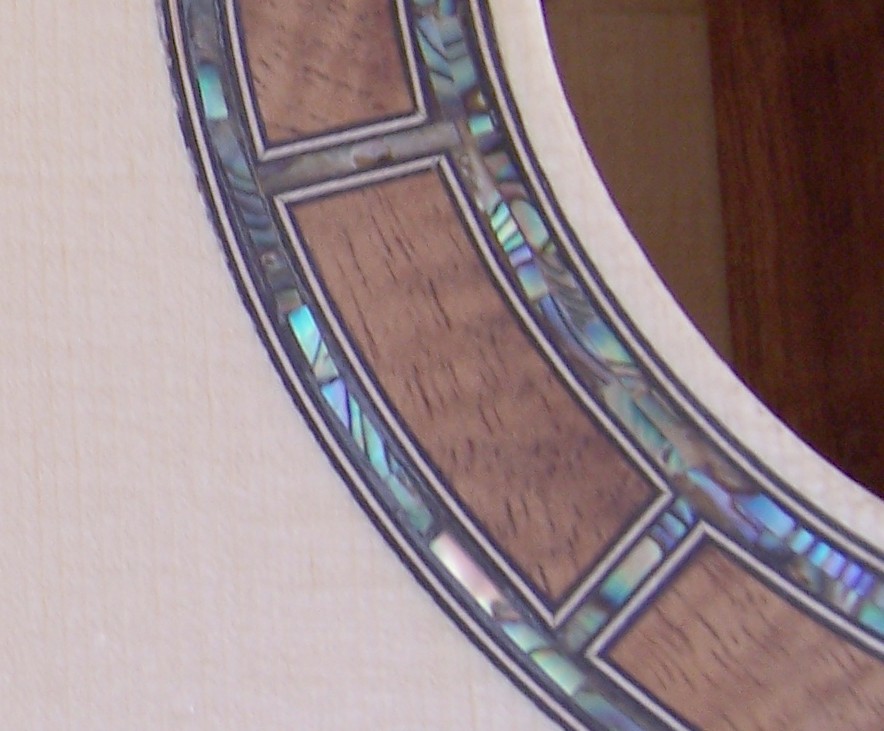
|
|
| Author: | Rod True [ Thu Sep 14, 2006 6:19 am ] |
| Post subject: | |
Show off
That is sooooooo nice Michael, Try that on your 3rd guitar eh? |
|
| Author: | Michael Dale Payne [ Thu Sep 14, 2006 6:49 am ] |
| Post subject: | |
There were only 12 of those Koa inserts. That is just 48 miters on the rosette, let alone the rest of a fully purfed guitar. I think there was a total of 62 purfling miters and 8 binding miters on this one. in truth I cheated Mr. Murphy just a bit on the rosette. I have a micro miter saw that I set up a jig for each of the 3 lengths required to purf the Koa segments just to make the process go quicker. |
|
| Author: | Brock Poling [ Thu Sep 14, 2006 7:01 am ] |
| Post subject: | |
[QUOTE=Mark Hanna] Thanks guys, but I guess the big problem is when I tape off the binding and purflings when glueing, the tape covers up the joints so as not to make them visable. I've put up a pic so you can see one of the "faulty joints". I thought I read somewhere that some luthiers tack with CA the corners (on headstock for instance), and then put them on with the miters all assembled. I had no luck. Maybe I just need more experience [/QUOTE]
There are 2 ways that I handle this. 1) there is a brand of clear 3M tape (I can get the product number for you tonight, or you could search on it) that will not stick to CA. So it is impervious and won't make a giagantic mess, and you can still see through it. 2) I tack weld all of my mitered purf joints with CA first then bind the rest of the areas. That is a huge help. |
|
| Author: | Kelby [ Thu Sep 14, 2006 9:34 am ] |
| Post subject: | |
Mark, For your third guitar, it looks like the guitar came out pretty nice overall! As for the miters, perfection takes practice; don't get discouraged. Probably the best suggestion I can offer is that if you have a flaw like this, rout it off and do it again right. And I'm not just talking about the miter. There is a significant gap between the purfling and the back near the tip of the cutaway, and the binding gets quite thin in that area as a result. With all the work you are putting into your guitars, you deserve a finished product that is free from these errors. (I hope this doesn't sound harsh; I'm sure you are already aware of these flaws.) Everyone makes mistakes like these. Those of us who are new make more than others who are more experienced, but we all make them from time to time. What makes a crafstman is the determination not to accept the mistakes, the self-discipline to take it off and do it again right. As a newbie, you might have to do it again five or six times before you get it right, but that's how you learn. Only that determination and discipline will enable your guitars to make the transition from "homemade guitars" to "custom instruments." On the practical side, here's a tip for eliminating gaps between the purfling and back like you have near the tip of the cutaway. Get some of those plastic Irwin clamps (Harbor Freight sells them, and so does Rockler) and, once you have your binding in place, use a clamp to pull the binding in tight in any areas with a tight bend. Usually, I put a tall, narrow piece of wood between the clamp and the binding so that the clamping pressure is focused right in the middle of the tight curve. If you have pre-bent the binding on a pipe or side bender, it shouldn't take much additional clamping pressure to pull the binding and purfling in nice and tight. |
|
| Author: | Rod True [ Thu Sep 14, 2006 9:44 am ] |
| Post subject: | |
[QUOTE=MichaelP] in truth I cheated Mr. Murphy just a bit on the rosette. I have a micro miter saw that I set up a jig for each of the 3 lengths required to purf the Koa segments just to make the process go quicker.[/QUOTE] That's not cheating, that's being smart. Your a smart one there Michael. Well done. |
|
| Author: | Mike Collins [ Thu Sep 14, 2006 10:09 am ] |
| Post subject: | |
mARK; aFTER ALL THE ADVISE YOU'VE GOT -i'M NOT SURE IF THIS WILL HELP- aLWAYS FIT AND GLUE YOUR MITERED ENDS FIRST! iN OTHER WORDS -FIT YOUR BINDINGS AND PURFS. DRY (WITHOUT GLUE)THE LEAVE THE UPPER BOUT TAPED OR BANDED -TAKE THE LOWE BOUT JOINT APART -(mAKING SURE THEY ARE PERFECT FIRST) tHEN START GLUING AT THAT LOWER BOUT JOINT-THEN AS YOU SECURE THAT PART YOU CAN LOSSEN THE UPPER BOUT AREA AND ADD GLUE ! thIS WAY YOUR LOWER BOUT JOINTS ARE TOGETHER AND SECURE! i USE A 90 DEGREE SANDER BY HAND TO MAKE SURE MY GLUE JOINTS ARE PERFECT! tAKE YOUR TIME -THIS CAN MAKE OR BREAK YOUR GUITARS LOKKS!! eVEN THOUGH LOOKS HAVE NOTHING TO DO WITH SOUND OR PLAYABILITY! Mc |
|
| Author: | Mike Collins [ Thu Sep 14, 2006 10:21 am ] |
| Post subject: | |
Mark; My last reply was for purfling & binding!! sorry I blanked out on the rosette problem! You have to actually cut the purfling piece slightly longer than you need! By only .010 -I know it's hard to feel and see -BUT just a hiar longer and miter the enns with a guide of some sort! Then you will have tight joints ! On less you are arthridic ! Sorry Late for to be up ! Mike Collins www.collinsguitars.com |
|
| Author: | CarltonM [ Thu Sep 14, 2006 12:33 pm ] |
| Post subject: | |
Mark, welcome to the OLF, and good luck--I'll be facing this in the future, too! Hey Steve S.--I like your mini-miter box solution. It could be the answer when faced with a goofy miter angle. |
|
| Author: | Billy T [ Thu Sep 14, 2006 7:10 pm ] |
| Post subject: | |
One thing I havn't really seen addressed is the purfling must disect the angle exactly in half. Even if it's off just a few degrees it will show up readily. On a florentine it's obvious that it's not 90?. It's difficult to get the angle as the two surfaces are adjoining radiuses. There is the trial and fit method, which will get you there, but if you want a head start, get a protractor and find the exact angle and divide it evenly, with a little excess to work with. Billy Dean Thomas |
|
| Author: | TonyKarol [ Fri Sep 15, 2006 12:18 am ] |
| Post subject: | |
Here is a good tip for doing the mitre on a florentine point - dont measure anything !!!! the number of degrees the abgle is doenst matter. If you look at the picture posted above, there are two points that define the angle required, whatever it may be. This is how I teach my students to do them. First, locate the two points - they are, 1, the outer point edge of the cutaway, and two, the point of wood of the back/top where the purfling will meet - so on hte photo abve, it the point of rosewood, where the inner blk/wh/blk purf was to meet. BTW, I have the piece of binding purf already glued in along the side, and it is hanging over the point of the cutaway - I am cutting this angle right on the guitar (I know, thats sounds scary - but if the chisel is sharp, rookies CAN do it) So now that you have located these tow defining points, set the chisel edge just to the safe side of the line they define, and SLOWLY push down, controlling the chisel, keeping it striaght up, and remove the overhang, getting close to where the line actually is. Now ,ove the chisel in closer, and pare off some more. Then get right on the line, and clean it up. You are over half done, because fitting the cutaway piece into this one os easier, and can be done with a sanding disc. I will usually cut the angel on the p-urfling pieces with a chisel, fine tuning until the fit is right, obvisouly staring with pieces that are too long. Same with the binding, but I will sand it to fit. Once both are fitting dry, I tape up with the filament tape, and add drops of CA to hold it all in. Once that sets, you are now ready to tackle the next mitre, at the neck block in the same way (the cutaway bind/purf is left long and overhangs here as well). I wish I had pix, I will have to take some the next guitar that gets done this way. The beauty of this, IMO, is that you make each mitre fit before adding any glue, then once you have it, move on. I am sure others do these differently, but this works for me, and my students have had great success with it. On this guitar, I did the first sharp mitre as the lesson, then JA did the other three (top and back) himself .. slow, and it works. 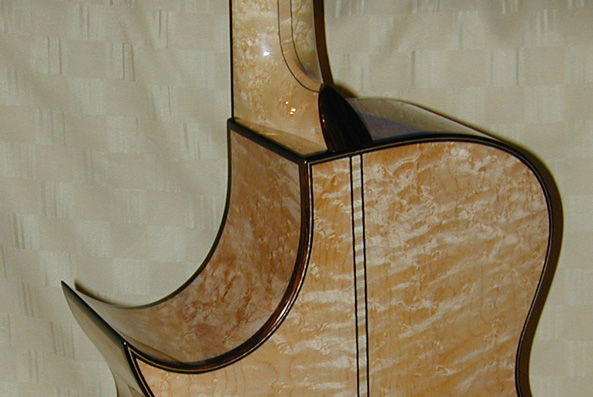
|
|
| Author: | Serge Poirier [ Fri Sep 15, 2006 12:31 am ] |
| Post subject: | |
Thanks Tony! |
|
| Author: | Mark Hanna [ Fri Sep 15, 2006 4:24 am ] |
| Post subject: | |
Thanks guys, youv'e been a great help. |
|
| Author: | Kelby [ Fri Sep 15, 2006 5:07 am ] |
| Post subject: | |
Tony, that's a great way of thinking about it! |
|
| Page 1 of 2 | All times are UTC - 5 hours |
| Powered by phpBB® Forum Software © phpBB Group http://www.phpbb.com/ |
|